The goal: to create a portable, habitable home with less than 120 square feet interior. Cozy is the word.
The first step was to find a platform on which to build my tiny house. I enlisted the help of my step-father, who has a huge amount of experience with building, and loves projects such as this.
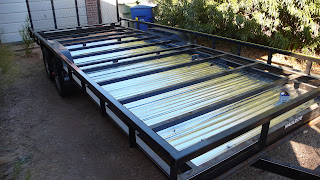
 After much research, I settled on this trailer. Although I liked the "deckover" variety because the deck extends all the way to the edges of the 8.5' total width of the trailer, they were too high off the ground. The height would have taken precious head room from my loft space, as the total project must remain under 13.5'. While other trailers are lower to the ground, the deck width is typically only the width that will fit between the wheels. and I needed that extra few inches on each side.
A happy compromise was found in this trailer. As you can see, the deck is below the wheel well, but it also extends all the way to the edge of the trailer before and after the fenders. I got a good deal on the trailer as the dealer was making room for 2010 models.
The dealer was kind enough to deliver the trailer to my house, saving me the cost of renting a truck. My Honda Fit would not be up to the task I'm afraid.
The next task was to remove the pressure treated boards that came on the trailer bed.
 My plan was to use the space underneath the platform level for insulation, thereby saving a little bit of headroom in my sleeping loft (I'm sort of tall, so every bit of space up there counts).
 After removing the boards, we were ready to begin installing the layers under the flooring. I made a large order at my local lumber yard, and they delivered the next morning.
The first layer was corrugated tin, so that there would be something to hold up the insulations. The tin was mounted between the two steel C bars which make up the primary support for the trailer along the left and right sides.

With a good cobalt drill bit, the tin panels went in quite easily.
And once the panels were in place, we put in a layer of vapor barrier, and then the insulation.


Once the insulation was done, one more layer of vapor barrier for good measure...


...and the first week of building is done!
In addition to the above, we spent a lot of hours planning, measuring, setting up electric saws, shopping for materials and ideas, and debating, as well as a huge amount of learning. Tomorrow will bring the floor, and then, if the weather isn't too bad, the walls and roof over the following couple of days!


You look very cute in your overalls.
ReplyDeleteWhat brand of trailer did you end up using... I have been looking for something exactly like what you found.
ReplyDeleteI apologize for neglecting your question, I had I didn't realize that I would not receive an email or something when I got a comment. Anyway, hope you are still interested in an answer...
ReplyDeleteMine is a HaulRite. It was more a result of what was available in my area at the time I needed to make the purchase than anything else. I had been looking at Big Tex trailers as well, but the dealer here had nothing that would work for me at the time.
Thanks!